Next Image is slow, do image proxy instead
I have used Google cloud storage to store my image, then I use Image component from Nextjs to render my image. Unfortunately, the image is very slow not as my expected.
Yes, it’s truly slow, in some cases. You can find out the discussion here
https://github.com/vercel/next.js/discussions/21294
This article is not about blaming Next Image, they’re doing very good job. But I hope they can have another idea to resolve the issue.
Next Image went slow
Next image is describe as allowing you to easily display images without layout shift and optimize files on-demand for increased performance. Basically, the purpose of Next Image is to automatically resize and optimize image load in the web page (and sharp is the one can help it works better under the hood), the Image api provide a multiple ways to resolve how your image show to your users.
I have no argue that the Next image is bad, at least, it works very well in my blog, I store my images in Firebase, technically it’s somehow same as google cloud, but the largest size I set is 768 width.
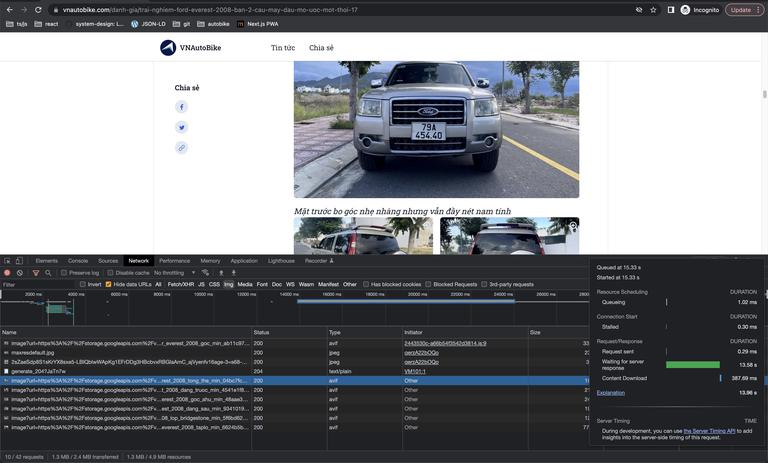
For my other project, the https://vnautobike.com/ , I need to have more larger size images, and the result for the Next Image this time is not very well at the first time load, after the image cached, it works very well, off course. Here I show you how slow of my image load.

Holly mother cow, it took 13s for the server to response, not because of the slow internet, not because of the gcloud storage. I don’t have much time to deep dive how Next image works. But base on the discussion, I can assume that because of Next or Sharp need time to resolve the image resolutions before shipping those to users screen. You can figure out how bad if it’s in slow internet situation.
Back to the traditional
So, whatever you do, at the end of the day, you need to have something simple. Nowadays, the browser does the heavy job for you. So you only need basic image element such as
<img
  srcset="elva-fairy-480w.jpg 480w, elva-fairy-800w.jpg 800w"
  sizes="(max-width: 600px) 480px,
         800px"
  src="elva-fairy-800w.jpg"
  alt="Elva dressed as a fairy" />
Or, for me, I’d like to use <picture/>
<picture><source srcset="mdn-logo-wide.png" media="(min-width: 600px)" />
	<img src="mdn-logo-narrow.png" alt="MDN" />
</picture>
the markup structure looks very straight forward, same as css @media. And here is my <Picture/> component
type SourceSetProps = {
  url: string;
  maxW: number | string;
};

export interface PictureProps extends ImgHTMLAttributes<HTMLImageElement> {
  sources?: SourceSetProps[];
}

export function Picture({ sources, loading = "lazy", alt, ...rest }: PictureProps) {
  return (
    <picture>
      {sources &&
        sources.length > 0 &&
        sources.map((set) => {
          return <source key={set.url} srcSet={set.url} media={`(max-width: ${set.maxW}px)`} />;
        })}
      <img alt={alt} loading={loading} {...rest} />
    </picture>
  );
}
Pretty simple right?
But, because I trusted to depend on Next Image to render image, I don’t have any pre-optimized size image ready for my <Picture/> component yet. Then I decide to use one of the best open source tool: the ImageProxy
Image Proxy
The Image Proxy is describe as “imgproxy makes websites and apps blazing fast while saving storage and SaaS costs”. It’s an open source project written by go, support wide range of optimize, processing, watermark… They have both open self deploy or more powerful feature for paid version. Within a very small project, I will deploy with Docker in my server.
A guy has a Docker compose version similar as mine, you can check it here
https://github.com/shinsenter/docker-imgproxy/blob/main/docker-compose.yml
I’m using gcloud storage, so I use these config inside the docker compose yml
### See: <https://docs.imgproxy.net/serving_files_from_google_cloud_storage>
# IMGPROXY_USE_GCS: "true"
# IMGPROXY_GCS_KEY: "<your key>"
Then I use nginx-proxy (see https://github.com/nginx-proxy/nginx-proxy) to expose the image proxy service to a domain, for example http://media.<my-domain>.com
Now you can sign to get your image at client
import crypto from "crypto";
import type { BinaryLike } from "crypto";

const IMAGE_SIZES = [480, 640, 750, 828, 1080, 1200, 1920]
const IMAGE_BASE_URL = "http://media.<my-domain>.com";
const GRAVITY = "no";
const ENLARGE = 1;
const RESIZED_TYPE = "fill";
const IMG_KEY = "your_key";
const IMG_SALT = "red_hot_chilly";
const BUCKET_NAME = "my_bucket";

const encodeUrlChars = (url: string) => url.replace(/=/g, "").replace(/\\+/g, "-").replace(/\\//g, "_");

const hexDecode = (hex: string) => Buffer.from(hex, "hex");

// Encode base64 url for image
const urlSafeBase64 = (data: Buffer | string) => {
  if (Buffer.isBuffer(data)) {
    return encodeUrlChars(data.toString("base64"));
  }
  return encodeUrlChars(Buffer.from(data, "utf-8").toString("base64"));
};

// sign hmac url for image
export const signUrl = (key: string, salt: string, target: BinaryLike) => {
  const hmac = crypto.createHmac("sha256", hexDecode(key));
  hmac.update(hexDecode(salt));
  hmac.update(target);
  return urlSafeBase64(hmac.digest());
};

const getEncodedPath = (encodedUrl: string, width: number): string => {
  const path = `/rt:${RESIZED_TYPE}/w:${width}/g:${GRAVITY}/el:${ENLARGE}/${encodedUrl}`;
  const signature = signUrl(IMG_KEY, IMG_SALT, path);

  return `/${signature}${path}`;
};

export function getImagePaths(fileName: string) {
  const url = `${BUCKET_NAME}/${fileName}`;
  const encodedUrl = urlSafeBase64(url);

  return IMAGE_SIZES.map((size) => `${IMAGE_BASE_URL}${getEncodedPath(encodedUrl, size)}`);
}
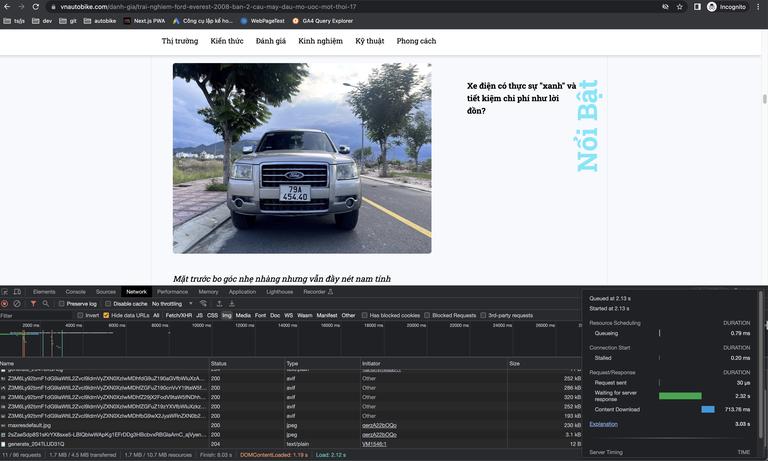
Let’s see the result of the implement

3.03s for load a large image, pretty good then before huh? Well, uhm, you can do more faster, I did it before, but it needs more thing to do. Solution is you can cache the process encoded path (the results of the getImagePaths ) in a whatever cache system depends on your needs, I did it with redis , so you don’t have to sign to get image paths on every request to your page. I leave the “how to do” part for you - solution is just about the idea.
Hope this article help.